TL;DR
- No-IP is in the built-in DDNS (Dynamic DNS) provider list on both Synology DSM and QNAP QTS, so setup is a menu selection.
- On Synology, go to Control Panel > External Access > DDNS. On QNAP, it’s in the network settings.
- If updates stop, check your update credentials, your password, and whether the hostname still resolves to your current IP.
You bought the NAS to stop renting cloud storage. That’s 8TB of your own photos and backups, sitting in a cabinet in the hallway.
And right now, you can only reach it from the couch.
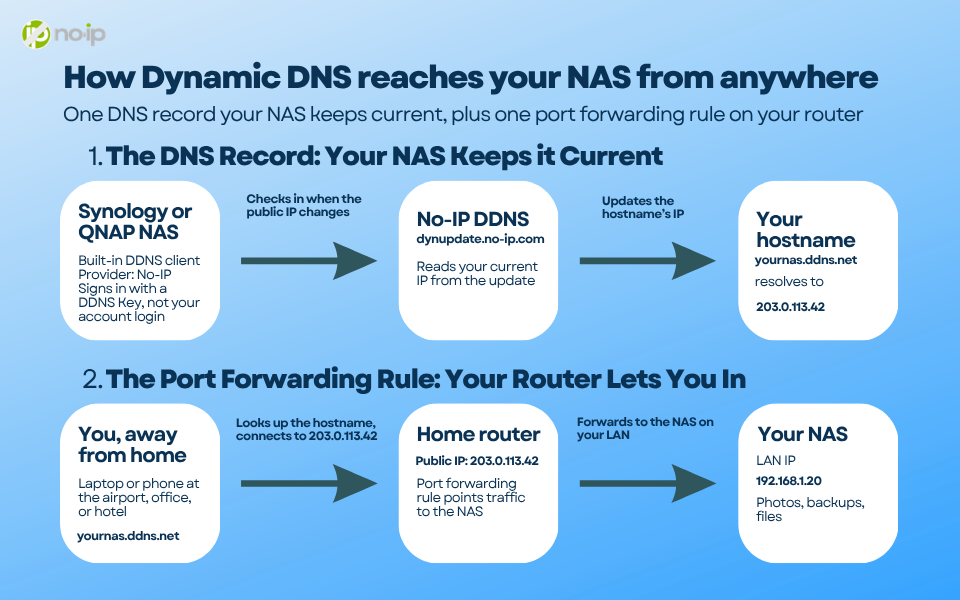
The gap between “works on my LAN” and “works from the airport” is one DNS record and one firewall rule. On a Synology or QNAP, the DNS half is a menu selection, because No-IP is already in the provider list both operating systems ship with. You don’t need scripts, a cron job, or a custom API string. Below is the path on each platform, the fallback for when the menu won’t cooperate, and what to check the day it quietly stops working.
Why the Built-In Provider List Matters
A NAS is close to the ideal DDNS updater. It’s always on, wired, and never leaves the house.
The only question is whether your NAS can talk to your DNS provider without you trusting a random tool from a stranger. On both platforms, it can. Synology DSM lists No-IP in its DDNS service provider drop-down, and QNAP’s documentation lists no-ip.com among its supported DDNS providers.
So the NAS keeps the hostname current on its own. You don’t need an update client on a separate computer, and you don’t depend on a router you may not control.
Before you start
- Create the hostname in your No-IP account
- Go to Managed DNS > DNS Records
- click Create Hostname
- Check Enable Dynamic DNS
- Generate a DDNS Key when prompted
- Copy the key password right away, because it’s only displayed once.
Synology DSM: Four Clicks and a Key
From the DSM desktop, open the Control Panel. Under Connectivity, click External Access, then open the DDNS tab.
Then, add a service and choose No-IP from the provider list. Then fill in these fields:
- Service Provider: No-IP
- Username/Email: your DDNS Key username or email
- Password: your DDNS Key password
- Hostname:
all.ddnskey.com - External Address: leave blank
Click OK. Thenm DSM tests the connection and, if it passes, points your hostname at your network’s current external IP.
One Synology note to know before you save is that using all.ddnskey.com as the hostname can interfere with some of DSM’s file sharing features. If you run into that, enter your actual No-IP hostname instead.
DDNS gets your hostname pointed at the right address. For remote access, you still need a port forwarding rule on your router that points to the NAS.
QNAP QTS: Same Idea, Different Panel
QNAP has moved these settings between releases, so you may need to check two places.
On current QTS builds, the DDNS settings live in the Network & Virtual Switch app, not the old Control Panel page. On older builds, go to Control Panel > System Settings > Network, then find the DDNS Service section.
Wherever you land, the steps are the same. Enable the DDNS service, pick No-IP from the provider list , and enter the same three values you’d give any No-IP updater: your DDNS Key username, your DDNS Key password, and your hostname.
QNAP labels the credential fields for a provider account rather than a key, and that trips people up. Use your DDNS Key credentials anyway. Keys are issued per hostname or per group of hostnames from the DNS Records page, so your NAS never holds your main account login.
When You Need the Custom Provider Route
Sometimes the built-in entry isn’t there. For example, the device might be on old firmware, the field labels might not match, or it’s a specialized model. Any device that accepts a generic DDNS URL can still update No-IP.
You’ll want to start with firmware. If No-IP isn’t in the list, no problem. Just update the firmware and look again, since manufacturers add providers between releases.
If the device asks for custom settings, use the following:
- Service Name: no-ip
- Custom Server:
dynupdate.no-ip.com - Custom URL:
/nic/update? - Hostname/Domain Name:
all.ddnskey.com - Username: your DDNS Key username
- Password: your DDNS Key password
If it wants one long URL instead of separate fields, use this string and swap in your own values:
http://username:[email protected]/nic/update?hostname=domain&myip=ip
Leave myip empty unless you’re deliberately sending a specific address.
If it takes a URL but has its own username and password boxes, leave the credentials out of the string:
https://dynupdate.no-ip.com/nic/update?hostname=domain&myip=ip
If none of that fits, hand the job to another device on your network. Your router very likely has No-IP built in, or you can run the Dynamic Update Client on any Windows, Mac, or Linux machine that stays on at home.
What to Check When Updates Stop
DDNS usually fails silently. Your hostname keeps resolving, just to an address that stopped being yours a week ago. Work through this list in order.
- Compare the addresses. Check the IP on your hostname in the No-IP dashboard, then check your real public IP at portchecktool.com from a device on the same network. If they don’t match, the updater is the problem [3].
- Force a test. In your account, change the hostname’s IP to
1.1.1.1and save. Restart the NAS or the updater, wait, and confirm your real IP comes back. That proves your credentials work end to end [5]. - Recheck the credentials. DDNS Keys are tied to hostnames. If you’ve regenerated your key at any point, every device still using the old one is now failing quietly [3].
- Strip special characters from the password. They’re one of the most common reasons a device says it’s configured but never updates [1]. If you’re using DDNS Keys, keep special characters out of the password entirely.
- Confirm the hostname. Free hostnames need confirmation every 30 days, with reminder emails 7 days ahead and on the day [7]. Paid plans drop that requirement and add more hostnames and other features [8].
- Check the firewall, too. If the hostname resolves to the right IP and you still can’t connect, DNS is doing its job. The port forwarding rule is what needs attention [1].
Your NAS is already the most reliable machine in the house. Give it the one job it’s built for, and stop wondering whether your address still works.
Grab a hostname on the free plan, then follow the Synology walkthrough with your NAS open in the other window.
Frequently Asked Questions
How do I set up dynamic DNS on a Synology NAS?
In DSM, go to Control Panel > External Access > DDNS, add a service, and choose No-IP from the provider list. Enter your DDNS Key username and password, use all.ddnskey.com as the hostname, and leave External Address blank. Click OK, and DSM tests the connection and updates your hostname to your current public IP.
Where are the DDNS settings on a QNAP NAS?
On current QTS builds, DDNS is in the Network & Virtual Switch app. On older builds, go to Control Panel > System Settings > Network and find the DDNS Service section. Enable the service, select No-IP, and enter your DDNS Key username, DDNS Key password, and hostname.
What username and password should my NAS use for No-IP?
Use your DDNS Key credentials, not your main No-IP account login. You create a DDNS Key when you enable Dynamic DNS on a hostname under Managed DNS > DNS Records. The key password is only shown once, so copy it right away.
What if No-IP isn’t in my NAS provider list?
Update the firmware first, since manufacturers add providers between releases. If it’s still missing, use the custom provider settings: server dynupdate.no-ip.com, URL /nic/update?, and your DDNS Key credentials. You can also let your router or the No-IP Dynamic Update Client handle updates instead.
Why did my DDNS hostname stop updating?
The most likely causes are a regenerated DDNS Key, special characters in the password, or a free hostname that wasn’t confirmed. Compare the IP on your hostname in the No-IP dashboard with your real public IP. If they don’t match, the updater is the problem.
Do I still need port forwarding if DDNS is working?
Yes. DDNS points your hostname at your home’s public IP, but your router still needs a port forwarding rule that sends the connection to the NAS. If the hostname resolves correctly and you still can’t connect, check the port forwarding rule.
Do free No-IP hostnames expire?
Free hostnames need to be confirmed every 30 days. No-IP sends reminder emails 7 days ahead and on the day. Paid plans drop the confirmation requirement and add more hostnames and other features.