TL;DR
Port forwarding breaks down for a lot of home networks today because of CGNAT, locked-down ISP routers, and the security risk of an open inbound port. The fix isn’t a workaround, it’s a different architecture: your home server makes an outbound connection to a broker service, so there’s no port to open and nothing to configure on the router. Pairing that with Dynamic DNS gives you a stable hostname on top of a tunnel that needs no router access at all, which is exactly how No-IP’s Public Tunnels works. Authentication and patching still matter, but the open-port risk goes away. Subscribe to the No-IP newsletter to get the full setup walkthrough and see what Public Tunnels can do for your homelab.
When the Homelab Works, But You Can’t Reach It
You spent a weekend building it. Proxmox humming along, a Plex or Jellyfin library finally organized, maybe a Home Assistant instance running your whole house. Then you leave for the weekend and want to check a camera feed or grab a file from your NAS, and none of it is reachable outside your own Wi-Fi. That’s the moment most homelabbers hit the port forwarding wall.
For years, port forwarding was the default answer: log into the router, map an external port to an internal device, and you’re reachable from anywhere. It still works for some setups. But for a growing share of home networks, it doesn’t work at all, and even when it does, it’s not the setup you actually want.
This isn’t a niche problem anymore. Self-hosting has moved well past the hobbyist fringe: home NAS boxes, Docker stacks, and single-board computers running a dozen services are now common enough that “just forward a port” doesn’t hold up as universal advice. The homelab of 2020, one device, one service, one forwarded port, has given way to entire stacks of interconnected containers, each with its own access needs. The access problem scaled right along with the hardware.
Why Port Forwarding Breaks Down at Home
Three things routinely prevent port forwarding from creating a connection, and they’re rarely the user’s fault.
CGNAT. Many ISPs now orient customers behind Carrier-Grade NAT to conserve IPv4 addresses. If your ISP does this, chances are you don’t have a public IP to forward a port to in the first place, and there are no router settings to go around it. You could contact your ISP and ask for a dedicated IP, which some carriers charge for, and some won’t offer it to residential customers at all.
Locked-down or ISP-managed routers. A lot of fiber and cable providers now ship combo modem-router units with limited or fully locked admin panels. Some may have branded firmware and won’t allow you administrative access to the hardware. If you can’t get into the port forwarding page, or the ISP’s firmware doesn’t expose one, the router itself is the wall.
Possible security exposure. Port forwarding should always be taken seriously. Opening an inbound port means the device is now directly reachable from the entire Internet. Every exposed port requires consistent management.
None of this means port forwarding is obsolete everywhere. If you own your router outright, have a public IPv4 address, and are comfortable maintaining firewall rules, forwarding a port for a single service can still be the simplest option. The issue isn’t that port forwarding stopped working. It’s that fewer home networks meet the conditions it needs.
What “No Port Forwarding” Actually Means
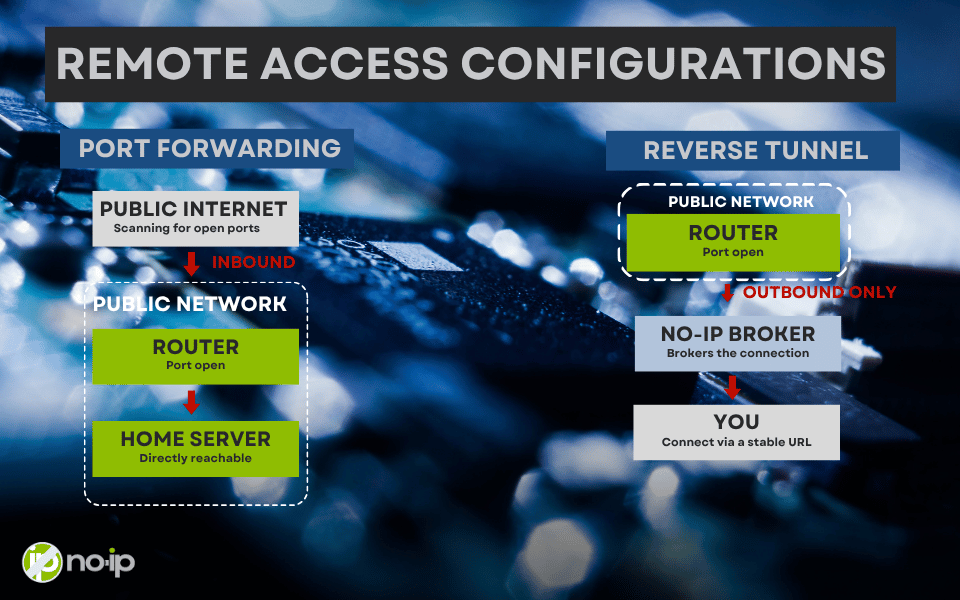
The alternative isn’t a workaround; it’s a different architecture. Instead of opening an inbound port and waiting for the internet to knock, your home server makes an outbound connection to a broker service. That connection stays open and quiet. When you (or a friend) want access, the request comes through that existing tunnel instead of trying to reach your router directly.
Reverse tunnels are allowed by almost every firewall and ISP, including CGNAT setups, because outbound traffic is what makes web browsing and app updates work in the first place. Nothing about your home network has to change to support it, along with no port forwarding page, calling your ISP, or static IP requirement.
This is the model behind tools like No-IP’s Public Tunnels: A device inside your home network initiates the connection outward, and access happens through a stable, shareable URL rather than an IP address and a port number. From the outside, there’s no open door to scan for. From your side, there’s no router configuration to maintain.
Security Still Matters
Removing the open port removes one category of risk, not all of them. Authentication still belongs in front of anything reachable this way, whether that’s a reverse proxy with basic auth or the login screen already built into the self-hosted app. Patching the underlying services still matters, and a tunnel’s access URL deserves the same handling as a password. It is shared deliberately, not pasted into a public Discord server or forum post.
The advantage of the reverse tunnel model isn’t that it makes security an afterthought. Instead, it eliminates the most common failure mode in home network security, which is a forwarded port left open on a device nobody has touched, or thought about, since it was first set up.
Dynamic DNS: The Piece Most Home Users Already Know
If you’ve been self-hosting for a while, you’re probably already familiar with Dynamic DNS (DDNS). It solves a narrower but related problem where your home IP changes, and DDNS allows you to have a hostname that doesn’t. In other words, instead of memorizing or scripting around an IP that resets every time your modem reboots, a DDNS client on your router, or a small local agent, keeps a hostname pointed at your current address.
DDNS on its own still assumes you can open a port for whatever’s listening behind that hostname. That works with a router that a user fully controls and has nothing like CGNAT in the way. It’s the setup a lot of us cut our teeth on: A hostname, a forwarded port, and a self-hosted service on the other end.
DDNS and reverse tunnels aren’t competitors. Instead, they’re complementary. The hostname gives you a stable, memorable address. The tunnel gives you a way to reach that address without needing an open port at all. Running them together means your access method survives an ISP swap, a CGNAT rollout, or a router replacement without you having to reconfigure anything on the client side.
Where This Leaves Your Homelab
If you’re running CGNAT, an ISP-locked router, or you’d just rather not have another open port to keep track of, an outbound tunnel paired with a stable hostname gets you remote access without any of that friction. It’s not a workaround bolted onto port forwarding, it’s the version of remote access that assumes modern home networks, and it holds up whether you’re checking a camera feed from the airport or handing a friend a link to your Jellyfin library.
The bigger shift here is philosophical as much as technical. A reverse tunnel doesn’t remove the tinkering; Homelabs will always have something to configure, but it does remove the one dependency that was never really about skill in the first place. Whether the ISP happened to hand out a public IP that week.
No-IP has been running DNS infrastructure for self-hosters and homelabbers for 25-plus years, and Public Tunnels is built for exactly this scenario: real, always-on access to devices on your own network, without opening a single port. If you want the setup walkthrough, product updates, and homelab-focused tips as they ship, subscribe to the No-IP newsletter and see what Public Tunnels can do for your home network.