TL;DR: Your camera works fine on home Wi-Fi but disappears the moment you leave because nothing on the public internet knows how to find it. There are two ways to fix that: Dynamic DNS (DDNS) with port forwarding (requires a real public IP and router access), or No-IP Public Tunnels (works behind Carrier-Grade NAT, no router access needed). This guide walks through both, plus brand-specific steps for Reolink, Amcrest, Hikvision, and Blue Iris.
You set up the camera. The app works great from the couch. Then you leave for work, open the app, and get nothing but a spinning wheel or a flat connection error. The camera is fine. Your internet is fine. The problem is that your camera lives on a private local network, and the public internet has no idea where to find it.
Remote access to a security camera lets you view a live feed and recorded footage from any device over the internet. To set it up, connect the camera to your local network, configure Dynamic DNS (DDNS) with port forwarding. Or, use a reverse tunnel if you are behind Carrier-Grade NAT or lack router access. Then, connect from your phone or browser using the camera’s hostname or tunnel URL.
This guide covers the two paths that actually work in 2026, how they are best applied, and steps to set them up by camera brand.
How Remote Camera Access Works
What your camera sends — RTSP and HTTP streams
An IP camera on your network may be running a small web server. It exposes two main ports: port 80 or 8080 for the browser-based web interface, and port 554 for the RTSP (Real Time Streaming Protocol) stream that video apps and recorders connect to. On your local network, your phone or NVR finds the camera automatically because everything is on the same subnet. You have to open a port to allow a connection to your camera.
The two walls — dynamic IP and CGNAT
The first wall is a dynamic IP address. Your internet service provider (ISP) assigns your home a public IP address, but that address changes periodically, usually daily. If you saved your camera’s IP address to connect remotely and your ISP reassigned it overnight, now you can’t connect because you have the wrong address to your device.
The second wall is Carrier-Grade NAT, or CGNAT. This one is harder to work around. When an ISP runs out of public IPv4 addresses, they set up multiple customers behind a single shared public IP. Your router has a WAN IP, but that IP belongs to the ISP’s network, not to you. Port forwarding can’t work because the shared IP is not yours to configure.
CGNAT self-diagnosis:
Method 1: Log in to your router and note its WAN IP address. Then visit Open Port Check Tool – Port Forwarding Port Check Tool from any device on the same network. If the two addresses differ, you are behind CGNAT.
Method 2 (no router login needed): If your router’s WAN IP starts with 100.64.x.x through 100.127.x.x, you are behind CGNAT. This is the RFC 6598 address range reserved by IANA specifically for carrier-grade NAT.
If you are behind CGNAT, skip straight to Option 3 below. For a deeper explanation of how outbound tunnels bypass CGNAT entirely, see how reverse tunnels bypass CGNAT.
Multiple Camera Brands
Accessing multiple camera brands from one place isn’t possible through manufacturer cloud apps—each brand has its own app with no cross-brand integration. No-IP Tunnels solves this: install the agent on a PC or NVR that sees all your cameras, configure tunnels for each, and access everything through No-IP hostnames.
Your Remote Access Options — What Actually Works in 2026
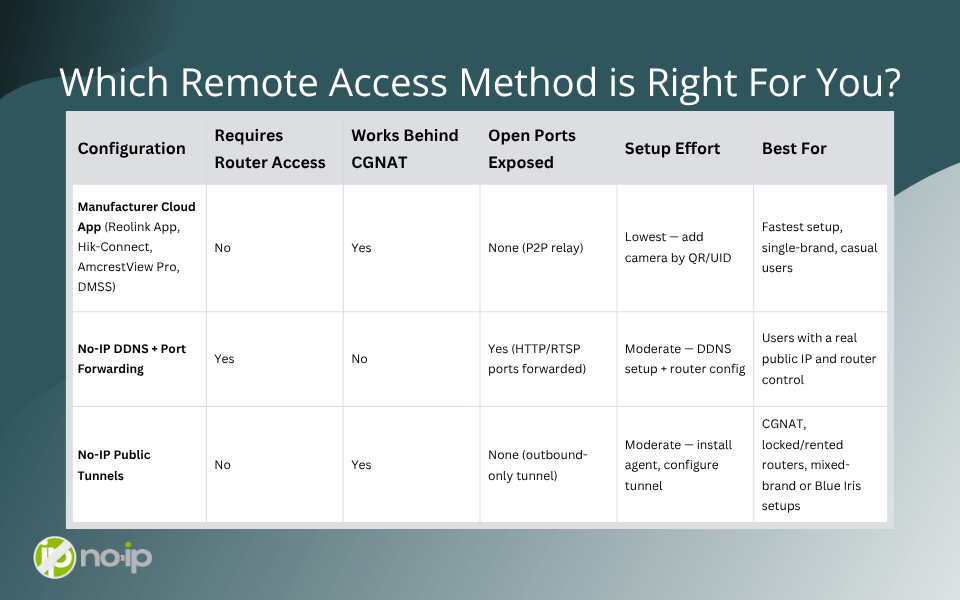
Option 1 — Manufacturer cloud app (works behind CGNAT, zero config)
Every major camera brand ships with a companion app that handles remote access out of the box. When you add a camera to the app, it registers with the manufacturer’s peer-to-peer (P2P) relay server. When you open the app remotely, your phone connects through that relay. No port forwarding, no router access, and it works behind CGNAT.
The trade-off is that you are trusting the manufacturer’s security posture and server uptime. The security section below covers why that trust has not always been warranted. Another limitation is if you run multiple brands, for example Reolink, Hikvision, and Blue Iris NVR, you end up juggling three separate apps with no unified view. That is the signal to look at Option 3.
Option 2 — No-IP DDNS + port forwarding (real public IP only)
No-IP’s free DDNS service solves the dynamic IP problem. You create a hostname and install the No-IP Dynamic Update Client (DUC) on a PC on your network, or enable DDNS in your router. No-IP keeps that hostname pointed at your current public IP even when your ISP changes it.
You still need to use port forwarding to tell the router to send traffic arriving on a specific external port to your camera’s local IP address. This method requires a real public IP address and router access.
Unfortunately, this option does not work behind CGNAT. If your CGNAT check showed mismatched IPs, move to Option 3.
Option 3 — No-IP Public Tunnels (recommended for most home users)
No-IP Public Tunnels flips the connection model. Instead of waiting for an inbound connection from the internet, the Tunnels agent installed on a PC on your local network reaches out to No-IP’s relay infrastructure. No-IP then makes your camera available through a stable hostname without any open ports, without router configuration, and without a real public IP.
This option works behind CGNAT and if you don’t have access to the router, for example, you are renting and cannot touch the router. It also works if your ISP blocks inbound connections entirely.
Which method is right for you?
Is Remote Camera Access Safe?
The short answer is it depends entirely on how you set it up. Open RTSP ports get indexed by Shodan, a search engine for internet-connected devices, within hours of going live. Default credentials on IP cameras are publicly documented. And the manufacturer cloud option, while convenient, has a track record that is important to be aware of.
| Incident | Year | What happened | Source |
|---|---|---|---|
| eufy / Anker | 2022 | Cameras marketed as end-to-end encrypted were found uploading unencrypted footage to cloud servers; live streams were accessible via VLC without authentication. | The Verge / NY AG settlement 2025 |
| Wyze | Feb 2024 | A caching failure during an outage let ~13,000 users see thumbnails and video from strangers’ cameras. | CNN / Washington Post |
| Dahua | Oct 2021 | Two authentication-bypass CVEs published; proof-of-concept exploit released before patch adoption was widespread. | BleepingComputer |
Reverse tunnels are safer than port forwarding because there is no open port on your network. Nothing is exposed to malicious actors. The connection initiates from inside your network. This is where No-IP’s Public Tunnels’ agent reaches out on behalf of the device rather than waiting to be connected to.
Port Forwarding Security checklist — run through this before exposing any camera to the internet:
- Change the default username and password on every camera before internet exposure
- Enable HTTPS/SSL on the camera web interface where supported
- Auto-lock camera interface after session timeout
- Keep camera firmware updated
- Disable remote access when not in use
Step-by-Step Setup — 3 Paths for 3 Situations
Path A — Manufacturer app (any platform, any network)
-
- 1.Download the official app for your camera brand (Reolink App, AmcrestView Pro, Hik-Connect, DMSS)
-
- 2.Create an account in the app
-
- 3.Add your camera by QR code or UID. This is typically found on a sticker on the camera body
-
- 4.The camera registers with the manufacturer’s P2P relay automatically
-
- 5.Connect from any device logged into the same account
✓ Works behind CGNAT · No port forwarding · No router access needed
Path B — No-IP DDNS + camera web interface (real public IP only)
-
- 1.Create a free hostname at no-ip.com
-
- 2.Install the No-IP DUC on a PC on the same network, or enable DDNS in your router’s settings
-
- 3.Log in to your router and port-forward your camera’s HTTP port and RTSP port to the camera’s local IP address
-
- 4.Access remotely via your hostname e.g.,
yourcam.ddns.net:8080
- 4.Access remotely via your hostname e.g.,
Port reference by brand:
-
- Reolink: HTTP (80) + RTMP (1935) for browser; Basic Service (9000) for the Reolink App; RTSP (554) for third-party players
-
- Amcrest: HTTP (80), RTSP (554)
-
- Hikvision: HTTP (80), RTSP (554 or 10554), app/iVMS-4200 (8000)
✗ Does not work behind CGNAT
Path C — No-IP Public Tunnels (any network, including CGNAT)
-
- 1.Create an account at no-ip.com
-
- 2.Install the No-IP Tunnels agent on a PC on the same local network as your camera
-
- 3.In the No-IP dashboard, configure a tunnel pointing to your camera’s local IP and port
-
- 4.Access remotely via the tunnel hostname. No router configuration, no open ports
Blue Iris users: Install the Tunnels agent on the Blue Iris PC. One tunnel to the Blue Iris web server port covers every camera in your setup.
✓ Works behind CGNAT · No router configuration · No open ports
Brand-Specific Walkthroughs
Reolink
DDNS via web UI: Log in to the camera’s IP address in your browser → Network > Advanced > DDNS → Enable DDNS → Server type: No-IP → enter your No-IP domain name, username, and password → OK.
Port forwarding: Forward HTTP (80) + RTMP (1935) for browser access. Forward Basic Service port (9000) for Reolink App remote access. Forward RTSP (554) for third-party players.
Behind CGNAT: Skip port forwarding — use No-IP Public Tunnels instead.
(For a full screenshot walkthrough, see Reolink’s support article: How to Set Up DDNS.)
Amcrest
Amcrest cameras expose DDNS settings directly in the web UI under the DDNS tab. For a complete step-by-step walkthrough of the Amcrest DDNS configuration with No-IP, see the No-IP knowledge base article on using security camera systems with No-IP.
Hikvision
Hikvision’s DDNS settings live in the camera or NVR web interface only: Configuration > Network > Basic Settings > DDNS. This option is not available inside Hik-Connect or iVMS-4200. For the full configuration guide, see the No-IP knowledge base article on setting up a webcam and accessing it from anywhere.
Blue Iris NVR
The recommended path is No-IP Tunnels: install the agent on the Blue Iris PC, configure a single tunnel to the Blue Iris web server port, and every camera in your NVR becomes reachable through that one tunnel URL. For the step-by-step guide, see the No-IP knowledge base article on using security camera systems with No-IP.
Quick Troubleshooting
Camera visible locally, not from outside. Run the CGNAT check at What Is My IP Address? Find Your Public IP & See IP Location . If you are behind CGNAT, port forwarding cannot work — switch to No-IP Tunnels.
Connection worked yesterday, fails today. Your public IP changed. Install the No-IP DUC and confirm it is set to start on boot so your hostname stays current.
Hostname resolves to the correct IP, but the connection still fails. This points to port forwarding, not DNS. The hostname did its job. Check that the HTTP and RTSP ports in your camera’s settings match the ports forwarded in your router, and that they’re forwarded to the camera’s correct local IP.
Two DDNS clients conflicting. If your router and your camera are both configured with DDNS, they override each other. Pick one source, either router-level DUC or camera built-in DDNS, and disable the other.
Can’t port-forward at all (renting, CGNAT, ISP-locked router). Use No-IP Public Tunnels. No router access required.
Reolink App can’t connect remotely, but the web browser works. The Reolink App uses the Basic Service port (default 9000), not HTTP port 80. Forward port 9000 in your router, or use No-IP Tunnels to skip port forwarding entirely.
Conclusion
Most cameras fail at remote access for one of three reasons: A dynamic IP that changes without warning, CGNAT that blocks inbound connections entirely. For configurations that involve CGNAT, locked routers, mixed brands, or for security minded individuals who don’t want to expose their network by opening a port, No-IP Public Tunnels is the best application.
If you are setting up remote access to a security camera and are not sure which method fits your network, start with the CGNAT check. The answer to that one question will point you in the right direction faster than anything else in this guide.
FAQ
What is the easiest way to set up remote access to a security camera with no built in remote access? The manufacturer cloud app (Reolink App, Hik-Connect, AmcrestView Pro) is the fastest path. Add the camera, create an account, and you are connected from anywhere. It works behind CGNAT and requires no router configuration. The trade-off is dependence on the manufacturer’s servers and security practices.
Does remote camera access work behind CGNAT? Yes, but only with methods that use outbound connections. The manufacturer cloud app and No-IP Public Tunnels both work behind CGNAT because the camera or agent initiates the connection outward. Traditional port forwarding does not work behind CGNAT.
What ports does a Reolink camera use for remote access? HTTP (80) for browser access, RTMP (1935) for browser streaming, Basic Service port (9000) for the Reolink App, and RTSP (554) for third-party players. DDNS setup requires the web UI or Reolink desktop Client. It is not available in the Reolink mobile app.
How do I know if I have a real public IP or CGNAT? Log in to your router and note the WAN IP. Then visit What Is My IP Address? Find Your Public IP & See IP Location . If the addresses match, you have a real public IP. If they differ, or if your WAN IP is in the 100.64.x.x–100.127.x.x range. you are behind CGNAT.
Is port forwarding a security camera safe? Exposing camera ports directly to the internet carries real risk. Open RTSP ports are indexed by Shodan, and default credentials are well-documented. If you use port forwarding, then it’s best practice to change default credentials, use a non-standard external port, enable HTTPS, and keep firmware current. No-IP Public Tunnels avoids this entirely by enabling remote access without needing to open any ports.
Can I access multiple camera brands from one place? Not through the manufacturer cloud apps each brand has its own app with no cross-brand integration. No-IP Tunnels solves this: install the agent on a PC or NVR that sees all your cameras, configure tunnels for each, and access everything through No-IP hostnames.
What is a DDNS hostname and why do I need one? A DDNS (Dynamic DNS) hostname is a fixed domain name that No-IP keeps pointed at your current public IP address. When your ISP changes your IP (which happens regularly on most home internet plans), No-IP updates the hostname automatically so your camera connection does not break.
Does No-IP work with Blue Iris? Yes. Blue Iris does not have built-in DDNS, but the No-IP Tunnels agent installs on the Blue Iris PC and creates a stable tunnel to the Blue Iris web server. One tunnel URL gives you access to all cameras in your Blue Iris setup and no port forwarding required.