
Connection, Power, and Flexibility with Linux
The No-IP team will be the first to proclaim they are Linux fans. In fact, there is even a company-wide Linux Slack chat room! Although the Mac and Windows systems are robust and dependable, the No-IP team appreciates that Linux has more advanced and modern code built in Rust, a memory-safe programming language that makes exploits and hacks a lot more difficult.
It’s only fitting that No-IP provides a Linux DUC. Our DUC continually checks for IP address changes in the background and automatically updates the DNS at No-IP whenever it changes for devices that are not already integrated with No-IP.
Take a look below at the installation process, specialized features, and some helpful tips.
Installation Process
You will need root user permissions to perform some of these functions, so use sudo when prompted.
There are a few notes before you start the installation process:
- We use Ubuntu in the example screenshots, but all Linux distributions should be supported.
- If you are using an ARM based device such as a Raspberry Pi, you can now use the APT package manager to easily install the No-IP DUC! Simply use the arm64 deb file instead of the amd64 file.
To being the installation process, you will need root user permissions to perform some of these functions, so use sudo when prompted. Then, open the terminal.
In our Linux DUC Installation Guide from our Knowledge Base, there are two ways to install the DUC:
- Using the Debian
aptPackage Manager - From Source
Package Manager
Note: This uses apt to install the No-IP DUC, so if you are on another distro, you can skip down to the “Installing from Source” section.
We recommend using your built-in Package Manager to install the program. This will download all dependencies and ensure it is installed correctly. The .deb file for installing on Debian-based setups, like Ubuntu, is included within the tarball in the Binaries folder.
First, download the Linux DUC:
wget https://www.noip.com/download/linux/latestThen, extract the file:
tar xvf latest
Now install it:
cd /home/$USER/noip-duc_3.1.0/binaries && sudo apt install ./noip-duc_3.1.0_amd64.deb
Note:
- If you are root, you do not need to issue the sudo command.
- If you are on a Raspberry Pi or other ARM based device, use the arm64 file in the binaries folder instead of the amd64 file.
sudo apt install ./noip-duc_3.1.0_arm64.deb
Once the command is complete, run noip-duc to start the program.
To explore the various options, run noip-duc –help to see the available commands.
Installing From Source
Another option to install the Linux DUC is by building the program from Source, which should work on any Linux platform.
Note: The Linux DUC is built in Rust, so make sure Rust is installed before you start the process.
First, download the Linux DUC:
wget https://www.noip.com/download/linux/latest
Then, extract the file and move it into the directory:
tar xvf latest cd noip-duc_3.1.0
Next, install Rust using the Rust toolchain installer:
curl --proto '=https' --tlsv1.2 -sSf https://sh.rustup.rs | sh
Type 1 > Default Installation when prompted.
Once Rust has been installed:
cargo build --release
Once that has been completed, copy the application to your programs folder:
sudo cp target/release/noip-duc /usr/local/bin
Now, you can run the No-IP DUC by issuing the noip-duc command!
Usage:
noip-duc [OPTIONS] --username <USERNAME> --password <PASSWORD>
Example:
noip-duc -g myhostname.ddns.net -u username -p password
Note: If you’re using DDNS Keys use your DDNS Key Username and your DDNS Key Password, along with all.ddnskey.com as the hostname.
There are a number of different features: Run noip-duc –help and be sure to check out the INSTALL.MD and README.MD files within the directory to see our full documentation and help guide.
But Wait, There’s More!
You probably want to run the Linux DUC in the background and ensure it starts automatically when your computer reboots. We have a separate guide which uses Systemd. Please see our documentation here.
Linux DUC Logs
One of the most popular inquiries regarding DUC is how to find logs. Take a look at the steps below to find out how to find the Linux DUC logs.
This will only work if you have set the No-IP DUC to run automatically at startup. To learn more on that, please see the guide here.
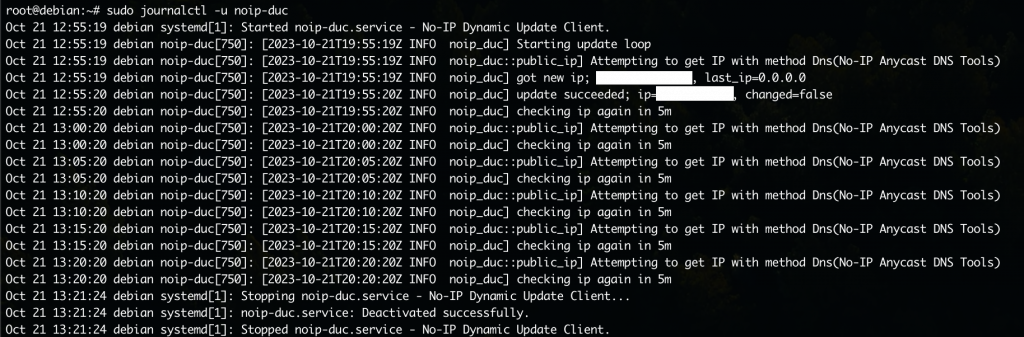
First, use the following command in your terminal to display all available application logs.
journalctl -u noip-duc
You can use a pipe | and tail for the logs to be outputted as a text file with a specific amount of lines.
journalctl -u noip-duc | tail -n [number of lines you would like to be output in the output log file] > noiplogs.txt

Then, the log file can be viewed in your home directory (/home/$USER) using the following command:
cat noiplogs.txt

THE Special Feature
If you’ve reviewed our Windows DUC and Mac DUC blogs in the series, you’ll notice there is a list of various special features that each DUC offers per their specific system. The Linux DUC has one special feature, but it’s pretty advantageous: It supports IPv6! Take a look at our Knowledge Base article about Automatic IPV6 updates with Linux DUC.
A Big Round of Applause
Special shoutout to our customers who volunteered to be our beta testers and provided valuable feedback. The No-IP team values any and all feedback so we can make our services and products the best possible for our users.
Have feedback or questions regarding the Linux DUC? Feel free to reach out to our exemplary Customer Service team to discuss further.