If your emails stop sending or your website won’t load, the issue often comes down to DNS.” This system translates easy-to-remember domain names into the IP addresses that computers use to communicate, so if yours breaks, everything else will grind to a halt.
In times like these, the Domain Information Groper (DiG) command comes in remarkably handy. With just a few keystrokes, you can look up records, confirm configurations, and trace queries to spot problems before they cause downtime, making DiG one of the most valuable DNS tools available.
Below is a closer look at its general functionality, as well as how you can pair the command with No-IP’s managed DNS and DDNS services to keep your domains fast and reliable.
Why DNS Troubleshooting Matters
When something goes wrong with your website or online service, the problem often comes down to your DNS. A misconfigured record, a delay in propagation, or an unresponsive server can each lead to downtime, failed connections, and frustrated customers. And that’s why DNS troubleshooting is a critical skill for anyone managing domains, websites, or networks.
What Is the DiG Command?
DiG is a powerful, lightweight command-line tool designed for DNS lookup and troubleshooting, built with speed, accuracy, and flexibility at the forefront. IT administrators, developers, network engineers, and simply curious users typically rely on DiG commands to validate their DNS configurations and ensure services are running smoothly. DiG interrogates DNS name servers so you can get to the root of connectivity problems.
By giving you direct insight into how your DNS servers are responding (which itself helps catch misconfigurations and pinpoint the sources of errors), the DiG command is one of the most trusted tools for diagnosing DNS problems; whether you’re running a personal website or overseeing organizational infrastructure, it belongs in your toolkit.
It’s even more effective when paired with a reliable DNS or managed DNS provider like No-IP; doing so will ensure that once you verify your configurations, your services remain accessible and secure.
Installing DiG
For many Unix- and Linux-based systems, DiG is already installed as part of these OS’s base DNS utility packages. It is included by default on macOS as well; just open your Terminal and type “dig noip.com”.
The DiG command for Windows is NSLOOKUP, which has a comparable utility:
➜ ~ nslookup noip.com
Server: 100.95.0.251
Address: 100.95.0.251#53
Non-authoritative answer:
Name: noip.com
Address: 158.247.7.200
Basic Syntax of the DiG Command
The DiG command follows a simple structure:

- server — Specifies the DNS server to handle the request (will use your default resolver if not specified). @8.8.8.8 will use google resolvers.
- name — The domain name to look up.
- record type — The type of DNS record to query (e.g., A, AAAA, MX, TXT).
- options — Additional flags or parameters, such as +short for a simpler output or -x for reverse lookups. Options with a dash are placed before the name.
You can use these elements to ask your DNS resolver to return specific records for the chosen domain. A no-frills version that simply checks the IP your domain is resolving to:
Common DiG Command Examples
The DiG command is incredibly versatile. In addition to querying a specific DNS server, some examples of its most useful lookups include the following:
- Lookup Record: Dig noip.com
- Check MX Records (Email): Dig noip.com MX
- Check NS Records: Dig noip.com NS
- Check TXT Records: Dig noip.com TXT
- Reverse DNS Lookup: Dig IP -x
- IP is the IP address you are trying to resolve to a hostname, e.g., 158.247.7.200, which resolves to noip.com.
Understanding DiG Output
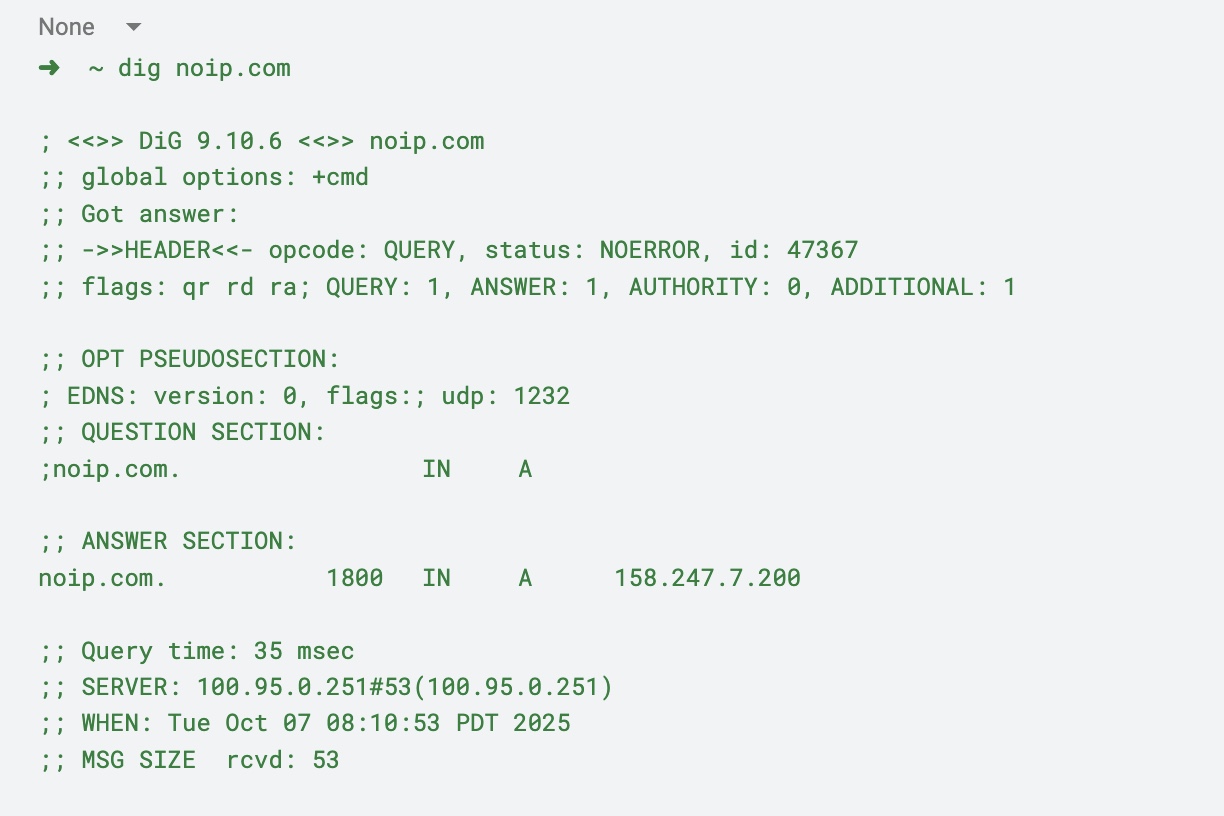
When you first run a DiG command query, the results can feel overwhelming. Your terminal will instantly fill with lines of text, timestamps, flags, and sections that may not be immediately intuitive. But once you know what to look for, the output becomes a roadmap to understanding how your DNS is working, or why it isn’t.
On that note, these are the key terms that you’ll find within your DiG command output:
QUESTION
Here, the DiG command is simply echoing back what you asked it to do. For example, if you typed “dig noip.com A,” the QUESTION section will confirm that you requested the A record for noip.com. You can think of it as your receipt, confirming that you typed in the command correctly and that DiG interpreted your query as intended.
ANSWER
The ANSWER section is usually where you’ll find the most valuable information, seeing as it contains the response from the DNS server you queried. If you requested an A record, for instance, the ANSWER section should display the IP address associated with the domain. For MX lookups, you’ll see mail servers listed with their priority values.
Reading through the ANSWER section closely helps you confirm whether your DNS is behaving as expected. If you updated a DNS record recently but still see the old IP in the ANSWER section, the change may not have propagated yet, or you may have queried a caching server still holding old data.
AUTHORITY
DNS is hierarchical, and the AUTHORITY section points to authoritative nameservers, which have the final say over the domain. If your query doesn’t return the record you expected, the AUTHORITY section can guide you toward the source of truth.
Let’s say, for instance, that you’re troubleshooting a website outage. Checking the AUTHORITY section can help you confirm that your domain is delegated to the correct nameservers; if they don’t match what you configured with your registrar or DNS provider, you’ve found a misconfiguration.
ADDITIONAL
The ADDITIONAL section is where the DiG command includes extra information that might help complete your query. For example, if your AUTHORITY section lists a nameserver, the ADDITIONAL section may provide its corresponding IP address, keeping the resolver from having to perform yet another lookup.
While the ADDITIONAL section may be easy to skim past, it’s particularly useful if you are troubleshooting complex delegation record issues. It can also help you verify that all the pieces of DNS resolution are connected and functional.
Advanced DiG Options
By adding onto your initial DiG command, you can flag issues that may be impacting functionality or reliability.
The +trace option allows you to trace the path your query takes, starting at the root DNS servers and moving down through top-level domains (TLDs) to the authoritative nameservers. It’s best to use +trace if you need to diagnose propagation issues, as you can find out where in the chain the problem is occurring and fix it.
There’s also the +short option, which provides a simplified answer, perfect if you need to run a quick check when scripting. For example, “dig noip.com A +short” will return only the IP address.
Lastly, the +noall and +answer combination will filter everything down to just the ANSWER section, which is particularly helpful when you’re validating results in a hurry or need to cut through noise during debugging.
Why DiG Is Essential for Network Reliability
Network reliability depends on your DNS; even if your servers are fully operational, a broken or misconfigured DNS record can make you appear offline. This is where DiG proves itself as more than just a diagnostic tool; it’s also a solution you can use to safeguard uptime in the following ways:
- Catching errors early
- Verifying propagation
- Pinpointing outages
For businesses, such reliability is non-negotiable. And when paired with No-IP’s managed DNS and DDNS services, you can use the DiG command to ensure your DNS stays resilient, redundant, and secure.
Best Practices for Using DiG
To get the most out of DiG, follow these proven practices:
- Compare multiple resolvers
- Use +trace strategically
- Document your queries
- Pair with a trusted DNS provider
Even the best troubleshooting can’t prevent downtime if your DNS infrastructure is weak. That’s why you need a provider you can count on.
Mastering DNS With DiG and Reliable Services
Mastering the DiG command means you no longer have to guess what’s happening with your DNS. Every lookup will provide visibility into how your domain is being resolved, ensuring that your online presence remains stable. Check out No-IP’s DiG tutorial for deeper examples and hands-on tips.
Frequently Asked Questions
What Is the DiG Command Used For?
DiG is used to query DNS records and troubleshoot network issues.
How Do I Install the DiG Command?
The installation process varies based on which operating system you are using. Linux typically has DiG preinstalled, as does macOS. Windows, however, does not, and instead requires an installation via BIND or the Windows Subsystem for Linux.
What Are the Most Common DiG Commands?
Some common DiG commands are as follows:
- Dig domain.com
- Dig domain.com MX
- Dig -x IP
- Dig @dns-server domain.com
Use these to explore connectivity and query your DNS information.
What Are Some Advanced DiG Options?
Use +trace to follow the path of your DNS query from root servers to authoritative ones, or +short for quick, simplified results. The combination +noall +answer filters output to show only the response you need.
How Does DiG Work With DNS Services Like No-IP?
DiG helps you test and verify DNS configurations, and No-IP ensures those configurations remain reliable, redundant, and easy to manage. Together, they give you visibility and peace of mind.