TL;DR
A reverse tunnel is a networking technique that allows a device inside a private or restrictive network to be securely accessed from the outside without requiring a public IP address, open inbound ports, or router configuration. Instead of waiting for an inbound connection (like traditional port forwarding), the device initiates an outbound connection to an external relay. Remote users then connect through that relay to reach the device. It’s the framework behind No-IP Public Tunnels and can be used for modern networks.
Why Port Forwarding Can’t Be Applied to Some Networks And What to Use Instead
For remote access, internal devices need to stay private and protected behind firewalls, but authorized users need to reach them from outside the network.
For years, port forwarding worked well for simple networks, and every connection had a static public IP. These days, that does not always apply to certain network configurations.
It’s become increasingly common to find devices situated behind the following:
- Carrier-Grade NAT (CGNAT)
- ISP-managed routers with locked-down admin panels
- Enterprise firewalls with default-deny inbound policies
- Multi-site deployments where no two networks are configured the same way
In these environments, port forwarding either fails silently or requires a level of network coordination that isn’t always practical. That’s the exact problem reverse tunnels were designed to solve.
In this guide, we’ll cover what a reverse tunnel actually is, how it works, and why it’s different from other remote access methods.
Basics: How Traditional Remote Access Works
In a standard port forwarding model, the flow goes as follows:
- An external user sends a request to your public IP address on a specific port.
- Your router receives the request, matches it to a forwarding rule, and routes the traffic to the designated internal device.
- The device responds, and traffic flows back out through the same path.
This is also known as an inbound model. The connection is initiated from outside your network and must be accepted at the network’s edge. That means three things need to be true:
- You have a real, routable public IP address (not a shared CGNAT address).
- You have admin access to the router to create the forwarding rule.
- Your firewall allows inbound traffic on the relevant port.
What Is a Reverse Tunnel?
A reverse tunnel is a flipped version of the inbound tunnel model. It’s “reverse” because the device you’re trying to reach is the one making the outbound call, not the person trying to reach it. In other words, instead of an external user reaching out to your network and awaiting access, the device inside your network reaches outward and establishes a persistent connection to an external relay server.
Once that outbound connection is established, remote users connect to the relay rather than directly to your device. The relay routes their traffic through the existing tunnel to reach the internal device, and responses come back the same way.
To the user, the experience is straightforward: they access a URL or endpoint, and they’re connected. The network complexities, such as NAT traversal, dynamic IPs, and firewall rules, are handled automatically behind the scenes.
Most importantly, outbound connections are rarely blocked. It’s open by default. Reverse tunnels provide reliable access where inbound-dependent methods consistently fail.
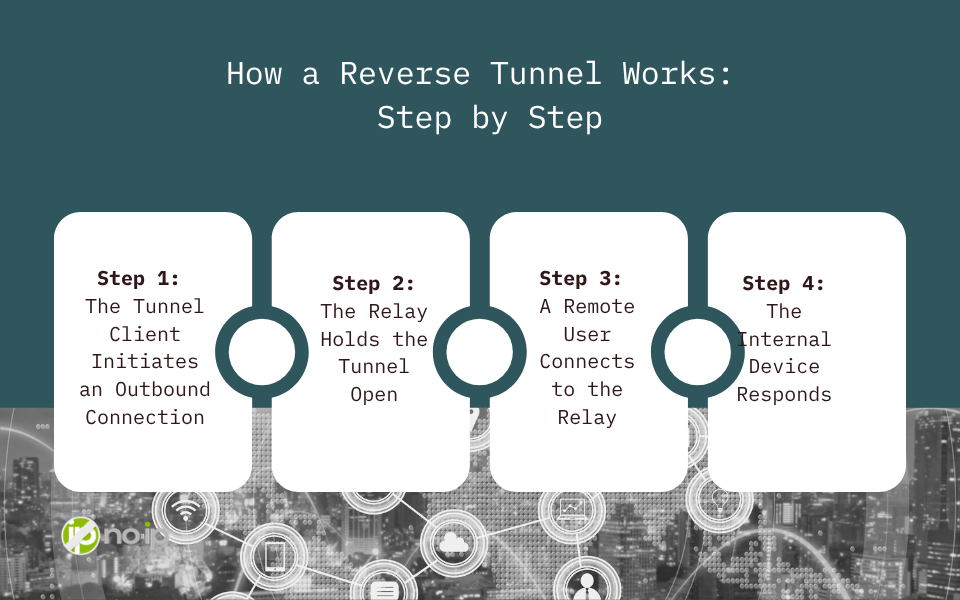
How a Reverse Tunnel Works: Step by Step
Here’s a breakdown of when a reverse tunnel is established:
Step 1: The Tunnel Client Initiates an Outbound Connection
A client is installed on the internal device (a server, NAS, or any system you want to reach remotely). On startup, this client establishes an outbound encrypted connection to a relay server, which is a managed, publicly reachable endpoint. No inbound ports need to be opened, nor router changes are required.
Step 2: The Relay Holds the Tunnel Open
The relay server maintains this connection persistently. It’s the public-facing endpoint that remote users will connect to. From the outside, it looks like a normal accessible endpoint. From the inside, it’s the outbound end of your tunnel.
Step 3: A Remote User Connects to the Relay
When an authorized user wants to access the internal device, they connect to the relay endpoint via a URL or hostname. The relay receives the request and routes it through the established tunnel to the internal device. Traffic flows back the same way.
Step 4: The Internal Device Responds
The internal device handles the request as though the user were connecting locally. From the device’s perspective, the connection arrived through the tunnel and not from an inbound internet request. Then, the response travels back through the relay to the user.
At no point does the internal device need to accept a direct inbound connection from the public internet. That’s what makes this architecture fundamentally different from port forwarding.
What Problems Does a Reverse Tunnel Solve?
Reverse tunnels are specifically designed for situations where inbound connectivity is unavailable, impractical, or unreliable. The most common scenarios include:
CGNAT (Carrier-Grade NAT)
CGNAT has become widespread across broadband, cellular, and satellite connections. When your ISP uses CGNAT, your router’s WAN IP is a private address shared by potentially hundreds of other subscribers. The result is that there is no way to route inbound traffic to your specific connection. Port forwarding rules on your router become irrelevant, and the issue is found at a layer you have no access to.
ISP-Managed or Locked-Down Routers
Many residential and small business connections come with ISP-provided hardware where admin access is restricted, or port forwarding is not supported. There’s no configuration you can make because you don’t have access to make it.
Enterprise Firewalls and Default-Deny Policies
Corporate environments typically operate under default-deny inbound firewall policies. Getting inbound rules approved involves change management processes, security reviews, and coordination across teams. For MSPs managing client infrastructure, navigating this at every site is a constant operational overhead.
Multi-Site and Distributed Deployments
Port forwarding doesn’t scale. Every site means a different router, admin interface, and a different set of firewall rules to manage.
Dynamic or Unknown IP Addresses
Even when port forwarding is theoretically possible, dynamic IP addresses introduce reliability issues. If your public IP changes, your remote access breaks until DNS catches up.
Security Considerations
A well-implemented reverse tunnel is actually more secure than port forwarding in several meaningful ways:
- No open inbound ports: Your device is never directly exposed to the public internet. There are no ports for scanners or attackers to probe.
- Encrypted transport: Depending on the brand, the tunnel connection uses TLS encryption, protecting data in transit.
- Controlled access paths: Access happens through a defined relay endpoint rather than a direct connection to your internal network, giving you a natural chokepoint for access controls.
- Reduced attack surface: Since there’s no inbound-facing server on your network, there’s nothing for an external attacker to target directly.
This architecture aligns closely with Zero Trust principles, where access is granted through explicit and controlled paths.
When Should You Use a Reverse Tunnel?
A reverse tunnel is the right tool when one or more of the following is true:
- Your network is behind CGNAT and port forwarding is not possible.
- You don’t have admin access to the router at the site you’re deploying to.
- Inbound firewall rules require approval processes that slow down deployment.
- You’re managing multiple sites and need consistent remote access without per-site manual configuration.
- You want to avoid exposing open ports on your network perimeter.
- Your IP address is dynamic and you need access to remain reliable without depending on DNS propagation timing.
If you have a public IP, full router access, and a controlled network environment, port forwarding may still be a fine choice. But for any deployment where those conditions aren’t guaranteed, a reverse tunnel is the more resilient architecture.
No-IP Public Tunnels: Reverse Tunneling Built for Real-World Deployments
No-IP Public Tunnels is No-IP’s managed reverse tunnel solution that is being built for scenarios where traditional remote access consistently fails. Instead of asking you to self-host a relay server and manage infrastructure, Public Tunnels handles the relay layer for you. You deploy a lightweight client on the device you need to reach, and No-IP handles the rest: a secure, persistent, and publicly accessible endpoint that brokers connections on your behalf.
Unlike developer-focused tunneling tools built for short-lived testing sessions, Public Tunnels is designed for always-on access to real-world devices and services. It’s built for IT teams, MSPs, and organizations that need remote access to work reliably across environments they don’t fully control. Plus, the Public Tunnels connection uses TLS encryption, protecting data in transit.
Public Tunnels is also the foundation for what comes next. No-IP is building toward Protected Tunnels and a longer-term transition to Zero Trust Network Access (ZTNA), where access is identity-aware, policy-driven, and designed for the modern threat landscape. Organizations that adopt Public Tunnels today are positioning themselves for where remote access is heading, not just solving today’s problems.
No-IP Public Tunnels is launching SOON! Learn how to get early access and be among the first to adopt this modern remote access solution.
The Bottom Line
CGNAT, locked-down ISP hardware, default-deny firewalls, and distributed multi-site infrastructure have made inbound-dependent remote access increasingly fragile.
By flipping the connection model and having the internal device reach outbound first, reverse tunnels make remote access work in environments where port forwarding fails, without requiring public IPs, open ports, or router configuration.